Bypassing advanced device profiling with DHCP packet manipulation
Device profiling may at first sound abstract to some readers, so let me first explain what this is.
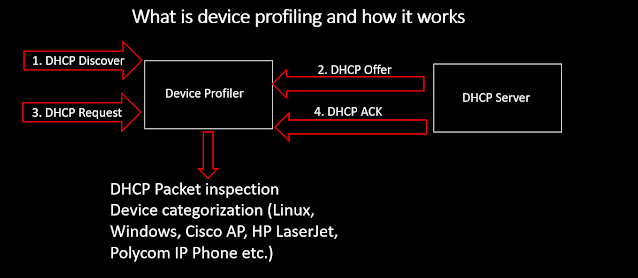
Device profiling is any mechanism that helps you determine the fingerprint of your device. The fingerprint may be any set of determinations whether your device is running Linux or Windows operating system, what its FQDN is, what version of particular software (antivirus etc.) it runs, maybe even contact details of the system administrator responsible for administering it.
"Option" is one of the relevant attributes that contains a list of attributes, each identified by the number in the brackets. The one particularly interesting is the "Parameter Request List". The Figure 5 below shows the expanded content of the "Parameter Request List".
Note the fields with checkmarks - NetBIOS indicates strongly we have a Windows client here. But this is not all - there are some additional DHCP attributes to help us profile the device even further. Let us have a look at one such , named "Vendor Class Identifier" in the Figure 6 below.Figure 6 -Vendor Class Identifier (Option 60)
Figure 7 - Cisco ISE policy for detection of Cisco AP 1500 series
This fingerprint can be extracted from various application protocols that the device is using to communicate with the networked resources - it may be using SNMP to allow various diagnostic data about its interfaces, DNS to identify its own name or to resolve other names, Cisco Discovery Protocol to identify features of neighboring Cisco devices, DHCP to require the IP address, DNS server, default gateway IP address etc.
So, where exactly would such a profiler sit and how does the whole thing work in a real life?
First step is to implement some kind of Network Access Control mechanism - the mechanism that will try to determine if your device is authorised to connect to the network in the first place. There are two ways how you perform device authorisation check:
a) dot1x (IEEE 802.1x) which uses some kind of authentication check - usually, this is checking the machine digital certificate issued to your legitimate device by your corporate PKI servers
b) MAB (MAC authentication bypass) which is used for devices that do not support dot1x.
Usually, various printers, IP cameras, IP phones, IP TVs etc. would not have support for dot1x. In that case MAB will inspect the MAC address of your device. However, MAB inspection is these days no longer restricted to MAC address inspection only - it can do far more by deep packet inspection of various network protocols.
By now you got the idea - network access control tried to determine if your device is legitimate and should it be allowed to connect to network. And it uses various techniques to do that.
These controls are implemented on the access layer of your network as is shown in the Figure 1 below.
Figure 1 - Access layer of the network model
What you would usually do is configure the corporate switch to deploy two mechanisms for device authentication - dot1x and mab (or vice versa) as shown in the Figure 2 below.
Figure 2 - order of device authentication mechanisms
Let us now take a look at the simplified DHCP packet exchange and the role of device profiler.
Figure 3 - DHCP session mechanicsIn the middle of the DHCP session is a device profiler that inspects the application payload of DHCP packets and constructs the profile of a device involved in the process. The interesting part of the DHCP payload is shown in the Figure 4 below.
"Option" is one of the relevant attributes that contains a list of attributes, each identified by the number in the brackets. The one particularly interesting is the "Parameter Request List". The Figure 5 below shows the expanded content of the "Parameter Request List".
Figure 5 - some attributes from the "Parameter Request List"
As you may suspect, "Vendor Class Identifier" , if present , contains either vendor ID, operating system ID or a device type. This example shows that the device is Cisco Access Point from 1500 series. Also, bear in mind that a mere list of attributes in the "Parameter Request List" may be sufficient to determine the device type- this sequence of attributes is different for Windows, Linux, LaserJet printers, Polycom or Cisco IP phones etc. Some vendors can even inject their own, proprietary DHCP fields. If this is the case, we can extract even more information about the device. These vendor specific attributes are described in rfc2132 (ietf.org).
The next Figure 7 will show an example of device profiling policy taken from Cisco ISE (Identity Service Engine), one very powerful device profiler. This policy detects Cisco Access Points,
I will analyse only the Condition No 1, as two others are not DHCP related. This is how this condition is defined.
Figure 8 - Condition from ISE policy to detect Cisco AP 1500The essence of this condition is to look for "dhcp-class-identifier" attribute and scan whether its value CONTAINS "Cisco AP" string. If it does, the condition triggers true and "Certainty Factor" increases for 10 points meaning, we increase our confidence into profiling.
At this point we have enough knowledge to devise an algorithm for attacking the device profiling , at least on the high level. This algorithm would look like this:
Figure 9 - high level algorithm for device profiling bypass.A couple of explanations here.
1. PoC code is available at https://github.com/adenosine-phosphatase.com/dhcpspoof. It is a python+Scapy script with some predefined device profiles you can select to mimic the legitimate device.
2. Run the packet tracer so that you can capture as many data from DHCP server as possible. That data will give you information for your IP stack initialisations (IP address, subnet mask, default gateway, DNS servers etc.)
I will now show you the mechanics of a simple MAC filtering bypass implemented on Windows 2019 DHCP server. The setup is simple - a single MAC filter on DHCP server rejects traffic from a specific MAC address. This MAC address happens to be the MAC address of my Linux attacking client.
Figure 10 - bypassing MAC filter on Windows 2019 DHCP serverThe requests from my attacking MAC address get rejected (no DHCP lease issued). But as soon as I spoof the MAC address of the attacking client, the DHCP server happily issues the IP address.
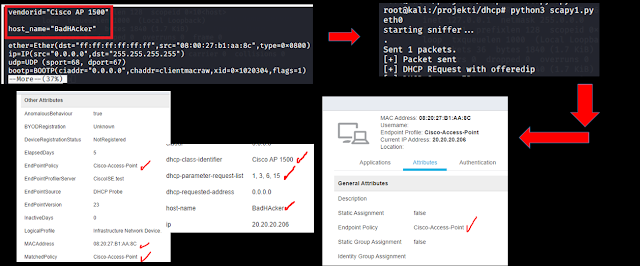
The next example is a bit more complicated - this time we're bypassing Cisco ISE DHCP profiling. First, we instruct our PoC code to spoof the "vendor class identifier" to simulate Cisco AP 1500. Then instead of using native Linux DHCP client, we fire up our PoC (which is nothing more than a stripped off DHCP client with customised payload).
Figure 11 - bypassing Cisco ISE DHCP profilerWhen the PoC is run, it will send DHCP packets with spoofed "vendor-class-id", which will trick the Cisco ISE profiler into believing the packets are coming from Cisco AP 1500 (instead of Linux , which launched the attack). Usually, Cisco ISE has very powerful detection capabilities and it will catch you if you're only trying to spoof MAC address (and leave the DHCP attributes intact).
Let us see how Cisco ISE caught me when I changed the MAC address only, trying to impersonate the legitimate device (Ricoh printer, in this case).
Figure 12 - Cisco ISE caught me in an attempt to bypass profiling by only MAC addressNote that the profiler caught my real host name, my dhcp-class-identifier, the dhcp-parameter-request-list sequence and classified this as anomalous behaviour. The reason was "Microsoft Workstation" was detected (instead of Ricoh printer). I was denied access in this case. However, when I spoofed the relevant DHCP attributes (see above in red), I managed to bypass it.
The next example will demonstrate the same methodology applied against Windows 2019 DHCP filter. This time it is no longer a simple MAC filter, but rather a DHCP packet inspection. We are using the same attribute (Vendor Class).
Figure 12 - Windows 2019 DHCP filter based on the "Vendor Class"Windows DHCP has two policies - one that returns the default gateway of 1.1.1.1 if the client is identified as Windows client, and 2.2.2.2 if the client is not Windows. The way how we bypass this protection is again, spoofing the Vendor Class ID to "MSFT 5.0", which is a typical signature for modern Windows based DHCP clients.
Figure 13 -Linux mimics Windows client and gets 1.1.1.1 as a default gatewayWhat we see here is that the attack is launched from a Linux client against Windows 2019 DHCP server. Windows DHCP issues the default gateway of 1.1.1.1 as it mistakenly "thinks" it's talking to Windows client (note the "MSFT 5.0" spoofed signature).
This is a medium risk - the attacker will need physical access to your network device to unplug it, sniff its traffic, shut it down etc. However, once they get the access to your networking device, your access controls are in jeopardy.
This risk can be mitigated relatively simply - do not rely on a single profiling policy. If you're using DHCP profiler, add at least one more check. This can be a simple nmap scan of the services running on the client. Although still prone to the attack, this time it will be much more complicated. The attacker would need not only bypass dhcp inspection, but will also need to devise some mechanism to mask or disable its network services (NetBIOS , SMB, RDP if running Windows or SSH, rpcbind if running Linux etc.)
Cisco ISE contains a number of policies, protocols and rules that you can use to enhance your profiling.
Windows DHCP server was never designed to be a device profiler, so its capabilities are limited only to DHCP inspection.
Beware, though, that too many inspection policies may slow down your network response, delay the network admission process and frustrate your customers.
Carefully balance your performance and security requirements.


Comments
Post a Comment